Automated Annotations
Automated Feature Extraction using Pliers
written by Alejandro de la Vega
This tutorial provides an introduction to the automated extraction of features from multi-modal naturalistic stimuli for use as regressors in event-related analyes. We will be using pliers, a Python library which provides a unified, standardized interface to dozens of different feature extraction tools and services, including state-of-the-art deep learning models.
In this lab we will cover:
Installation and getting started
Pliers fundamentals
Extracting features
Converting stimuli across modalities
Chaining converters and feature extractors manually
Speech to Text Conversion using APIs
Speech / Text based extractors
Complex workflow managment using Pliers Graph API
from IPython.display import YouTubeVideo

YouTubeVideo('4mQjtyQPu_c')
Why use Pliers for automated feature extraction?
Naturalistic fMRI paradigms have gained popularity due to their potential to more closely resemble the complex, dynamic nature of real-world perception. Due to their very nature, however, these complex stimuli pose serious practical challenges to analyze. Manual annotation is effortful and time consuming, and does not scale to capture the wide range of perceptual dynamics present in these stimuli.
Fortunately, recent advancements in machine learning have made it possible to rapidly and automatically annotate multi-modal stimuli with a wide range of algorithms. Extracted features range from low-level perceptual features (such as brightness and loudness), to complex, psychological relevant features such as predictions from state-of-the-art language comprehension models. The timecourses of these extracted features can then be used as regressors in task-based fMRI analysis.
A consequence of the variety of potential features available, however, is that the interfaces to these various algorithms, and content analysis APIs are highly heterogenous. Simply installing and writing the code necessary to interface and harmonize these algorithms can be a substantial endeavour. Pliers aims to facilitate the process by providing a uniform interface to a wide range of tools under an easy to use and unified Python framework.
Installation
Installating the base pliers package is simple, just use pip:
pip install -U pliers
As pliers interfaces with dozens of external libraries, there are many optional dependencies that are not installed by default to keep the installation light. Pliers will prompt you with installation instructions if you try to use an extractor that is not yet installed.
Naturalistic Stimuli from ParanoiaStory and Sherlock
We’ll be working with the first run stimuli from the ParanoiaStory and the Sherlock datasets.
ParanoiaStory is an audio narrative, while Sherlock is a an audio-visual episode from a TV show.
Let’s set up the paths of these stimuli and take a quick look at what we’re dealing with. Make sure you change the two data_dir paths to where you have install the Paranoia and Sherlock datasets.
import os
import datalad.api as dl

data_dir_paranoia = '/Volumes/Engram/Data/Paranoia/'
data_dir_sherlock = '/Volumes/Engram/Data/Sherlock/'

paranoia_audio = os.path.join(data_dir_paranoia, 'stimuli', 'stimuli_story1_audio.wav')
sherlock_video = os.path.join(data_dir_sherlock, 'stimuli','stimuli_Sherlock.m4v')

# If datasets haven't been installed, clone from GIN repository
if not os.path.exists(data_dir_paranoia):
    dl.clone(source='https://gin.g-node.org/ljchang/Paranoia', path=data_dir_paranoia)

if not os.path.exists(data_dir_sherlock):
    dl.clone(source='https://gin.g-node.org/ljchang/Sherlock', path=data_dir_sherlock)

# Initialize dataset
ds_paranoia = dl.Dataset(data_dir_paranoia)
ds_sherlock = dl.Dataset(data_dir_sherlock)

# Get Paranoia story
result = ds_paranoia.get(paranoia_audio)

# Get Sherlock video
result = ds_sherlock.get(sherlock_video)
Getting Started
The best way to see what pliers can offer is to jump right into an example.
Example 1: Audio RMS
A measure that is likely to capture a large amount of variance in auditory cortex activity during naturalistic stimulation is the power of the signal in the auditory track. A simple way to measure this is by extracting the Root-Mean-Square (RMS) of the audio signal across time.
Pliers makes this very easy. All we need to do is to import the RMSExtractor object, and apply it to the ParanoiaStory audio stimulus.
from pliers.extractors import RMSExtractor

# Create an instance of this extractor
ext = RMSExtractor()

# Extract features from the audio stimulus
rms_result = ext.transform(paranoia_audio)
The Extractor returns an ExtractorResult object which contains the extracted values.
We can easily convert this to a Pandas DataFrame, a familar format that could easily be fed into a data-analysis pipeline, and is easy to inspect.
rms_df = rms_result.to_df()
rms_df
| order | duration | onset | object_id | rms | |
|---|---|---|---|---|---|
| 0 | 0 | 0.01161 | 0.000000 | 0 | 0.000743 |
| 1 | 1 | 0.01161 | 0.011610 | 0 | 0.000776 |
| 2 | 2 | 0.01161 | 0.023220 | 0 | 0.000823 |
| 3 | 3 | 0.01161 | 0.034830 | 0 | 0.001723 |
| 4 | 4 | 0.01161 | 0.046440 | 0 | 0.001852 |
| ... | ... | ... | ... | ... | ... |
| 45124 | 45124 | 0.01161 | 523.888617 | 0 | 0.001723 |
| 45125 | 45125 | 0.01161 | 523.900227 | 0 | 0.001555 |
| 45126 | 45126 | 0.01161 | 523.911837 | 0 | 0.001433 |
| 45127 | 45127 | 0.01161 | 523.923447 | 0 | 0.001312 |
| 45128 | 45128 | 0.01161 | 523.935057 | 0 | 0.001174 |
45129 rows × 5 columns
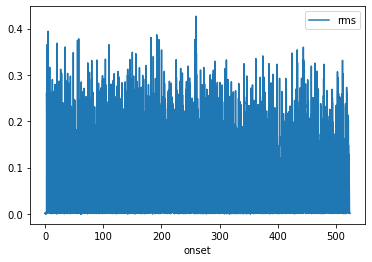
We can then easily plot the timeline of rms across time for the ParanoiaStory study.
%matplotlib inline
rms_df.plot('onset', 'rms')
<matplotlib.axes._subplots.AxesSubplot at 0x14520c5c0>
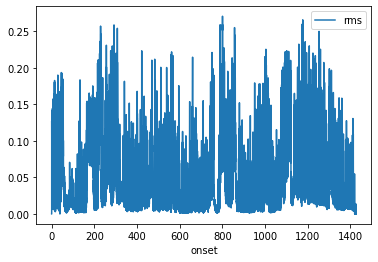
We can now do the same thing for the Sherlock video stimulus, using the same RMSExtractor.
ext.transform(sherlock_video).to_df().plot('onset', 'rms')
<matplotlib.axes._subplots.AxesSubplot at 0x148066898>

That was easy! We can now see that the RMS profile of Sherlock is very different from the ParanoiaStory narrative.
But, wait. How were we able to apply RMSExtractor to a video when this is an audio Extractor?
Under the hood, pliers noticed this mismatch, and automatically converted the Sherlock video clip to an audio stimuli by extracting the audio track. As a result, the RMSExtractor just worked and returned to you the result you were expecting.
Before we can understand how pliers does this, and how you can do this with greater manual control, it’s important to first understand some basic concepts.
Fundamentals of Pliers
This section is adapted from the pliers documentation. For a more in-depth dive, see the official documentation.
Stims and Transformers
Pliers is deliberately designed with simplicity in mind, and loosely modeled after usage patterns in scikit-learn.
At its core, pliers is based around two kinds of objects: the Stim, and the Transformer.
A Stim is a container for a data object we want to extract features from– for example, the Sherlock video clip or the ParanoiaStory audio clip.
If you pass a string path to the transform method of an Extractor, pliers will attempt to automatically load the stimulus. This automatical detection is not fool proof, however, so explicilty loading the stimuli can be useful.
A Transformer provides functionality to do something with Stims–either to change the input Stim in some way (e.g., converting a Stim from video to audio), or to extract feature data from it (such as extracting rms from an audio stimulus).
Let’s modify the previous example to explicitly load our stimuli:
from pliers.stimuli import AudioStim
from pliers.extractors import RMSExtractor

stim = AudioStim(paranoia_audio)
ext = RMSExtractor()
rms_features = ext.transform(stim)
We can see the separation between the target of the feature extraction (the ParanoiaStory AudioStim), and the RMSExtractor object that transforms this stimulus into an ExtractorResult.
This basic pattern persists throughout pliers, no matter how many Transformers we string together, or how many Stim inputs we feed in.
Types of Transformers
There are three types of Transformers in pliers, and all take Stim objects as inputs.
Extractorsreturn extracted feature data asExtractorResultobjects (which can be converted to a pandas dataframes).We have already seen an example of this with
RMSExtractor, but there are dozens more in pliers.Converterstake aStim, and convert it to a different type ofStim.For example, the
VideoToAudioConvertertakes aVideoStimas input, and returns anAudioStimwith ony the audio track as output.Filterstake aStim, and return a modifiedStimof the same type.For example, the
ImageCroppingFiltertakes anImageStimas input, and returns anotherImageStimas output, where the image data stored in theStimhas been cropped by a bounding box specified by the user.
A complete listing of all Transformers is available in the offical pliers documentation.
In practice, users will primarily interact with Extractors, as pliers will automatically convert stimuli prior to extraction, greatly reducing the complexity of the code.
However, it’s often useful to manually combine these operations to fully control the process.
Example 2: Manual stimulus conversion + RMSExtractor
In Example 1, we applied the RMSExtractor to a the Sherlock video stimulus, and pliers automatically converted the stimulus from VideoStim to an AudioStim containing only the audio track.
Let’s modify this example, to use manual conversion from Video to Audio:
from pliers.converters import VideoToAudioConverter
from pliers.extractors import RMSExtractor

# Set up Extractor and Converter
conv = VideoToAudioConverter()
ext = RMSExtractor()

# Transform Video to Audio
audio_only = conv.transform(sherlock_video)
# Transform Video to RMS results
audio_result = ext.transform(audio_only)

audio_result.to_df().plot('onset', 'rms')
<matplotlib.axes._subplots.AxesSubplot at 0x14920f7b8>
As you can see, the results are identical to letting pliers handle the conversation.
Example 3: Face detection, frame sampling, and chaining Transformers
There are times when we need to specify the conversion parameters, and thus prefer not to rely on Pliers’s automatic conversion. We can accomplish this by manually chaining a Converter to an Extractor
In this example, we’ll be using the FaceRecognitionFaceLocationsExtractor to detect faces in the Sherlock video stimulus.
This extractor provides an interface to the face_recognition python package.
from pliers.extractors import FaceRecognitionFaceLocationsExtractor

# Using the more accurate 'cnn' model, change this to 'hog' for faster perfomance
face_ext = FaceRecognitionFaceLocationsExtractor(model='cnn')

# This extractor expects ImageStim as input
face_ext._input_type
pliers.stimuli.image.ImageStim
If we use this extractor to transform a VideoStim, pliers will implicitly use the FrameSamplingConverter.
However, it will do so with the default parameters, which in this case would extract every frame. This is too fine grained, as we want to save ourselves the computation, and only sample infrequently for this example.
To convert the Sherlock stimuli from video, to ImageStim frames sampled at 0.1Hz (i.e., one frame every 10 seconds), we need to:
First, load the VideoStim, and use the FrameSamplingFilter to subsample this set of ImageStims at 0.1hz.
from pliers.stimuli import VideoStim
from pliers.filters import FrameSamplingFilter

video = VideoStim(sherlock_video)

# Sample at 0.1 Hz
filt = FrameSamplingFilter(hertz=0.1)
selected_frames = filt.transform(video)

# Number of sampled frames
selected_frames.n_frames
143
Note:
FrameSamplingFilter expects a collection of ImageStims as input, and returns a subsampled collection of ImageStims. However, here it can take VideoStim as input, as pliers will impliclty convert VideoStim -> ImageStim. Since there are no important parameters to modify in this step, we can let pliers handle it for us, instead of doing it explicitly.
Next, we can use the FaceRecognitionFaceLocationsExtractor to detect and label face locations in the subset of frames
Note that since we transformed a collection of frames, the result of this operation is a list of ExtractedResult objects.
To merge these objects into a single pandas DataFrame, we can use the helper function merge_results.
Note that the following cell will take a few minutes to run (~4min, depending on your computer specs).
from pliers.extractors import merge_results
from pliers import config
# Disable progress bar for Jupyter Book
config.set_option('progress_bar', False)

# Detect faces in selected frames
face_features = face_ext.transform(selected_frames)
merged_faces = merge_results(face_features, metadata=False)

# Show only first few rows
merged_faces.head(12)
| order | object_id | onset | duration | FaceRecognitionFaceLocationsExtractor#face_locations | |
|---|---|---|---|---|---|
| 0 | NaN | 0 | 60.0 | 10.0 | (37, 415, 207, 245) |
| 1 | NaN | 0 | 90.0 | 10.0 | (57, 516, 97, 477) |
| 2 | NaN | 0 | 100.0 | 10.0 | (72, 570, 241, 400) |
| 3 | NaN | 0 | 120.0 | 10.0 | (49, 167, 117, 99) |
| 4 | NaN | 0 | 130.0 | 10.0 | (144, 466, 191, 419) |
| 5 | NaN | 0 | 140.0 | 10.0 | (102, 185, 159, 128) |
| 6 | NaN | 0 | 150.0 | 10.0 | (37, 260, 207, 90) |
| 7 | NaN | 0 | 160.0 | 10.0 | (8, 565, 252, 320) |
| 8 | NaN | 0 | 210.0 | 10.0 | (68, 433, 125, 376) |
| 9 | NaN | 0 | 240.0 | 10.0 | (125, 119, 193, 51) |
| 10 | NaN | 1 | 240.0 | 10.0 | (137, 341, 194, 284) |
| 11 | NaN | 2 | 240.0 | 10.0 | (125, 519, 182, 462) |
len(merged_faces.onset.unique())
89
There are 89 unique onsets, which indicates that faces were found in 89/143 frames.
The FaceRecognitionFaceLocationsExtractor#face_locations column also indicates the location of each face in CSS order (i.e., top, right, bottom, left).
Tip: In some frames (e.g. 240s), multiple faces were found, and there are multiple rows for a given onset. To disambiguate these rows, pliers assigns each occurace a unique object_id column value. Read more](http://PsychoinformaticsLab.github.io/pliers/results.html#understanding-object-ids) about object_id.
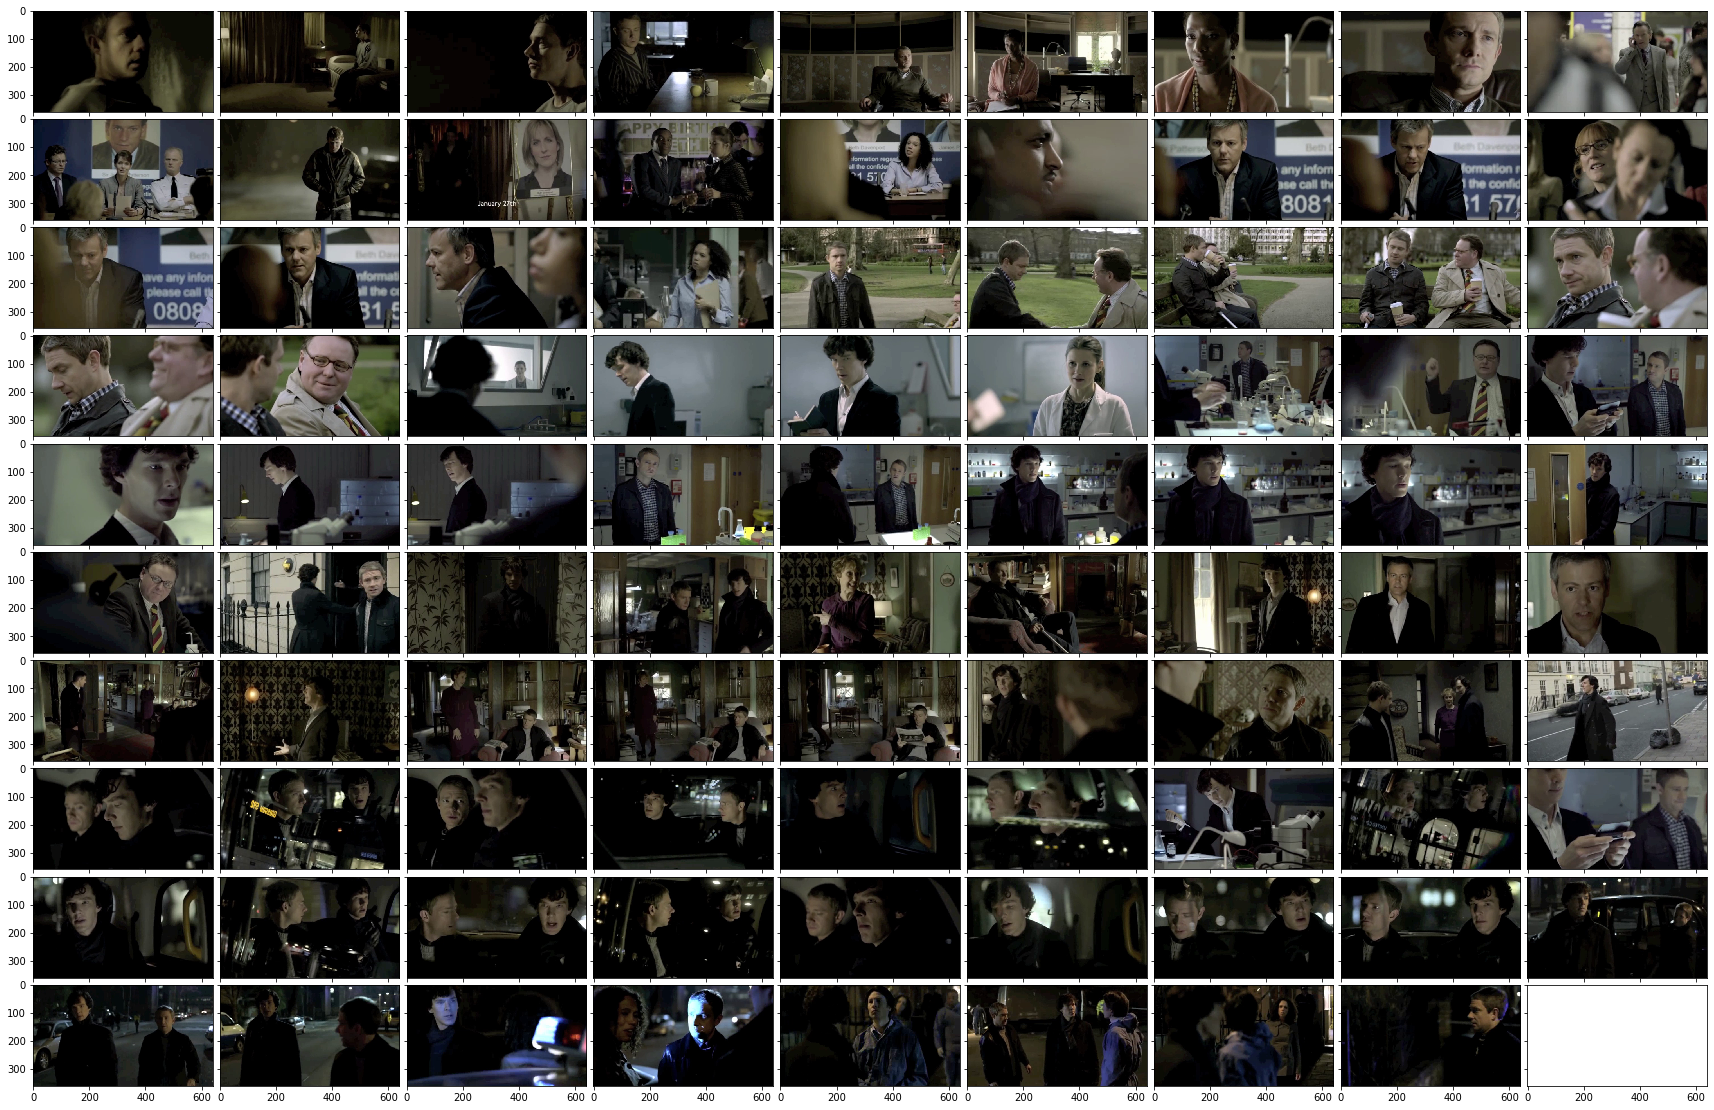
Now, Let’s plot all of these frames where faces were found!
# Filter selected frames to only include those with faces
# and extract stimulus "data" (numpy representation of image frame) from the ExtractorResult object
face_frames = [f.data for f in selected_frames if f.onset in merged_faces.onset.tolist()]
import matplotlib.pyplot as plt
from mpl_toolkits.axes_grid1 import ImageGrid
import numpy as np

def plot_img_grid(img_list, shape, figsize=(30., 30.)):
    fig = plt.figure(figsize=figsize)
    grid = ImageGrid(fig, 111, nrows_ncols=shape, axes_pad=0.1)

    for ax, im in zip(grid, img_list):
        ax.imshow(im)

    plt.show()
plot_img_grid(face_frames, (10, 9))
Now, let’s take a look at the frames without a detected face:
nonface_frames = [f.data for f in selected_frames if f.onset not in merged_faces.onset.tolist()]
plot_img_grid(nonface_frames, (5, 9))
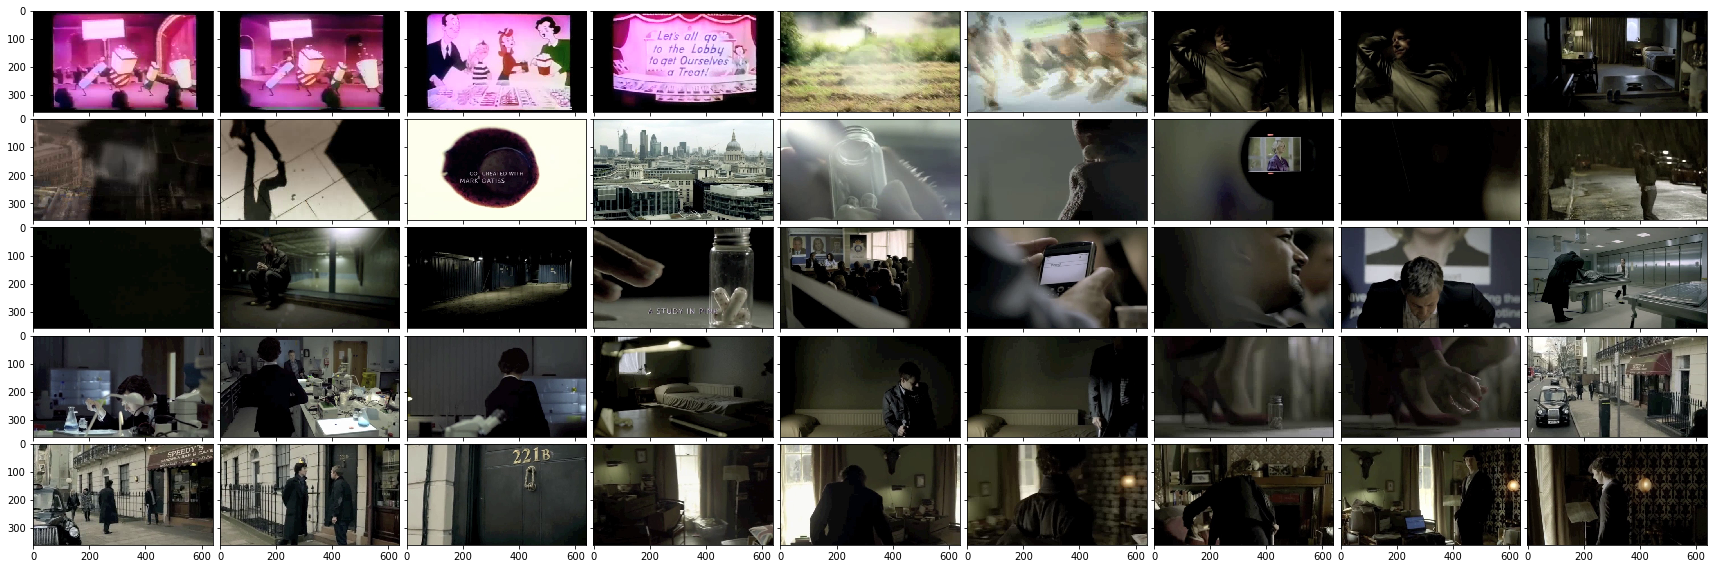
Great, for the most part it looks like the algorithm corrently idenitfied frames with visble faces, with occasional misses when faces were small.
When to use implicit conversion?
Now that you know how to manually convert stimuli, you may wonder, when should I use manual conversion, and when should I rely on implicit conversion?
Pliers will always attempt implicit conversion when there is a mismatch between the input, and the expected input to a Transformer. If in doubt, inspect the _input_type attribute of an Extractor.
face_ext._input_type
pliers.stimuli.image.ImageStim
ExtractedResult objects also keep a history of what was done prior to Extraction, which you can always inspect
str(face_features[0].history)
'VideoStim->FrameSamplingFilter/VideoFrameCollectionStim->VideoFrameCollectionIterator/VideoFrameStim->FaceRecognitionFaceLocationsExtractor/ExtractorResult'
Note: You can learn more about Transformation history in the pliers docs.
If in doubt, simply chain Converters to Extractors manually.
If you want to learn more implict conversion, this topic is discussed in the Pliers documentation.
Speech-to-text Converters
So far, we have experimented with extracting features from AudioStim and VideoStims. However, many naturalistic datasets feature extensive human speech, which likely drives a substantial amount of brain activity.
However, to analyze the speech language, we need a precisely aligned transcript of speech.
Recent advancements in deep convolutional networks have spawned dozens of speech-to-text language models, that promise accurate, time-locked transcripts of speech. The best available models are currently paid services that can be accessed remotely using APIs. Pliers has implemented support for several speech-to-text services (as well as image analysis APIs). For this example, we’ll be using a service called Rev.ai to transcript run 1 of Paranoia Story to text.
Example 4: Speech-to-Text Conversion with Rev.ai
Remote service API Credentials
To use remote APIs, we need to give pliers our private credentials for these paid services, by setting the appropriate environment variable in our environment to the access key. For more details, see here
For the sake of this tutorial, you can sign up for a free trial of rev.ai (5 hours free, no CC required). We have also provided a pre-extracted transcript that you can load instead.
Once signed up visit https://www.rev.ai/access_token_ to receive an access token, and set your token to the environment using the following command:
import os
os.environ['REVAI_ACCESS_TOKEN'] = 'PRIVATE_KEY' # replace PRIVATE_KEY with your own key!
Warning! Never share this token or push to GitHub!
Although we’re using a machine-learning model to transcribe our audio file, pliers considers this a Converter, as we transform an AudioStim to a ComplexTextStim.
Let’s try it out:
from pliers.converters import RevAISpeechAPIConverter
ext = RevAISpeechAPIConverter()

# Uncomment the next two lines if you have set up the Rev.AI keys
# transcript = ext.transform(paranoia_audio)
# transcript.save(data_dir_paranoia + 'stimuli/paranoia_story1_transcript.txt')
WARNING:root:Beginning audio transcription with a timeout of 1000.000000s. Even for small audios, full transcription may take awhile.
# For the sake of the demonstration, let's load an pre-existing transcript
from pliers.stimuli import ComplexTextStim
transcript_file = data_dir_paranoia + 'stimuli/paranoia_story1_transcript.txt'
transcript = ComplexTextStim(transcript_file)
transcript
<pliers.stimuli.text.ComplexTextStim at 0x1478a1cc0>
As you can see, the type of transcript is ComplexTextStim. A ComplexTextStim is simply a container object that is composed of several TextStims which represent individual words. Each individual TextStim element can then be associated with individual onsets and/or durations
# First first elements of the transcript
transcript.elements[:5]
[<pliers.stimuli.text.TextStim at 0x1478a1710>,
 <pliers.stimuli.text.TextStim at 0x1478a1ac8>,
 <pliers.stimuli.text.TextStim at 0x1478a1588>,
 <pliers.stimuli.text.TextStim at 0x1478a1c18>,
 <pliers.stimuli.text.TextStim at 0x1478a1ba8>]
# First word of the transcript
transcript.elements[0].text
'The'
# Specific onset for this word
transcript.elements[0].onset
2.09
Tip
pliers by default caches the result of Extractors in the background. If we were to re-run this RevAISpeechAPIConverter a second time on the same stimulus, it will simply used the cached results rather than perform a potentially expensive repeated API call. This caching behavior applies to all Transformers and can save needly re-extraction.
Let’s take a closer look at the transcript by loading it as pandas DataFrame.
import pandas as pd
pd.read_table(transcript_file).head(15)
| onset | text | duration | |
|---|---|---|---|
| 0 | 2.09 | The | 0.21 |
| 1 | 2.30 | 0.36 | |
| 2 | 2.66 | came | 0.42 |
| 3 | 3.11 | late | 0.27 |
| 4 | 3.38 | one | 0.24 |
| 5 | 3.62 | afternoon | 0.69 |
| 6 | 4.55 | as | 0.18 |
| 7 | 4.73 | dr | 0.39 |
| 8 | 5.12 | Carmen | 0.39 |
| 9 | 5.51 | Reed | 0.33 |
| 10 | 5.84 | was | 0.18 |
| 11 | 6.02 | sitting | 0.36 |
| 12 | 6.38 | in | 0.15 |
| 13 | 6.53 | her | 0.15 |
| 14 | 6.68 | office | 0.51 |
In just a few minutes, and a few lines of code, we have a fairly accurate, precisely aligned transcript for ParanoiaStory.
Now, what can we do with it?
Example 5: Text-based Extractors
Pliers offers support for dozens of Extractors that operate on TextStims.
A light-weight and surprsingly useful approach is simply to annotate words using Dictionaries of established word norms. Pliers makes this is easy using the DictionaryExtractor.
A DictionaryExtractor simply maps words to arbitrary features encoded in a user-provided look up table. Pliers comes with built-in support for several word-norm mappings using the PredefinedDictionaryExtractor.
The predefined dictionaries built-in to pliers can be seen in the repository.
In this example, we’re going to extract values for age-of-acquisition (Kuperman et al., 2012) and affective valence (Warriner et al., 2013).
from pliers.extractors import PredefinedDictionaryExtractor

dictext = PredefinedDictionaryExtractor(
    variables= {
        "affect": ['V.Mean.Sum'],
        "aoa": ["AoA_Kup"]
    })

norms_results = dictext.transform(transcript)
from pliers.extractors import merge_results
norms_df = merge_results(norms_results)
norms_df[['stim_name', 'onset', 'PredefinedDictionaryExtractor#affect_V.Mean.Sum',
          'PredefinedDictionaryExtractor#aoa_AoA_Kup']].head(15)
| stim_name | onset | PredefinedDictionaryExtractor#affect_V.Mean.Sum | PredefinedDictionaryExtractor#aoa_AoA_Kup | |
|---|---|---|---|---|
| 0 | text[email] | 2.30 | 6.00 | 11.520000 |
| 1 | text[late] | 3.11 | 3.32 | 5.280000 |
| 2 | text[one] | 3.38 | 6.09 | 3.227100 |
| 3 | text[afternoon] | 3.62 | 6.68 | 4.650000 |
| 4 | text[as] | 4.55 | NaN | 6.104490 |
| 5 | text[in] | 6.38 | NaN | 3.685351 |
| 6 | text[her] | 6.53 | NaN | 5.092075 |
| 7 | text[office] | 6.68 | 4.54 | 6.680000 |
| 8 | text[filling] | 7.43 | NaN | 6.818509 |
| 9 | text[out] | 7.76 | NaN | 3.280385 |
| 10 | text[medical] | 7.97 | 5.22 | 8.680000 |
| 11 | text[for] | 8.81 | NaN | 4.388713 |
| 12 | text[the] | 8.99 | NaN | 3.983747 |
| 13 | text[she] | 9.65 | NaN | 3.568124 |
| 14 | text[that] | 10.34 | NaN | 5.529012 |
In a single dataframe, we can see the input words, and the values for each of the two norms we requested.
Note
If a Dictionary does not include the requested word, it will be encoded as NaN value. If both dictionaries are missing the word, it will be dropped when merging.
Graph API: Managing complex workflows
Congratulations At this point, you should now enough to take advantage of the majority pliers has to offer.
But, with great power comes great responsibilty… or rather, complex workflows.
Say you want to extract various features on the Sherlock dataset, which require distinct conversion steps. You could do as we have so far, and string together various Transformers and manually connect them, but this can become cumbersome, and verbose.
For example, suppose we want to extract both visual and speech transcript-based features from the Sherlock dataset. Specifically, let’s say we want to encode the visual brightness of each frame and detect faces. We also run a sentiment analysis model on a speech transcription extracted from the audio track of the videos. We also want to extract frequency norms on each transcribed word. This requires us to do all of the following:
Convert the video to a series of video frames, using FrameSamplingFilter;
Run a brightness extractor on each image frame;
Detect faces for each frame;
Extract the audio track from the video;
Transcribe the audio track to text;
Run a sentiment analysis model (in this case, using the Vander sentiment extractor) on the transcribed text.
Run a predefined dictionary extractor on the transcribed text
Using the normal pliers API, the code to run these steps would look like this:
from pliers.stimuli import VideoStim
from pliers.filters import FrameSamplingFilter
from pliers.converters import RevAISpeechAPIConverter
from pliers.extractors import (VADERSentimentExtractor, FaceRecognitionFaceLandmarksExtractor)

stimulus = VideoStim(sherlock_video)

# Sample 2 video frames / second
frame_filter = FrameSamplingFilter(hertz=0.1)
frames = frame_filter.transform(stimulus)

# Face extraction
face_ext = FaceRecognitionFaceLandmarksExtractor()
face_results = face_ext.transform(frames)

# STFT Extraction
stft_ext = STFTAudioExtractor(freq_bins=[(100, 300)])
stft_res = stft_ext.transform(stimulus)

# Run the audio through RevAI's text detection API
transcriber = RevAISpeechAPIConverter()
transcripts = transcriber.transform(stimulus)

# Apply Vader sentiment analysis extractor
sentiment = VADERSentimentExtractor()
sentiment_results = sentiment.transform(transcripts)

# Apply PredefinedDictionaryExtractor
dict_ext = PredefinedDictionaryExtractor(['affect/V.Mean.Sum',
                                         'subtlexusfrequency/Lg10WF'])
dict_results = dict_ext.transform(transcripts)

# Combine visual and text-based feature data
results = face_results + [stft_res] + sentiment_results + dict_results

# # Merge into a single pandas DF
df = merge_results(results)
The above code really isn’t that bad – it already features a high level of abstraction (each Transformer is initialized and applied in just two lines of code!), and has the advantage of being explicit about every step. Nonetheless, if we want to save ourselves a few dozen keystrokes, we can use pliers’ Graph API to abbreviate the listing down to just this:
from pliers.graph import Graph

# Define nodes
nodes = [
    (FrameSamplingFilter(hertz=0.1),
         ['FaceRecognitionFaceLandmarksExtractor', 'BrightnessExtractor']),
    (STFTAudioExtractor(freq_bins=[(100, 300)])),
    ('RevAISpeechAPIConverter',
         [PredefinedDictionaryExtractor(['affect/V.Mean.Sum','subtlexusfrequency/Lg10WF']),
          'VADERSentimentExtractor'])
]

# Initialize and execute Graph
g = Graph(nodes)

# Arguments to merge_results can be passed in here
df = g.transform(sherlock_video)
This short example demostrates a powerful way to express complex extraction workflows in pliers.
If you’d like to learn more about the Graph API, you can head over to the documentation.
Where to go from here?
Pliers is a powerful, yet easy to use Python library for multi-modal feature extraction. In this short tutorial, you’ve seen how to use pliers to modify, convert and extract features from stimuli.
To see the full range of Transformers implemented in pliers, refer to this listing
What’s most exciting about pliers, and the quickly evolving landscape of feature algorithms is that they are constantly evolving. New developments promise to allows to extract ever more psychologically relevant features from naturalistic stimuli, automatically.
To that end, pliers is designed to be easily expanded by open-source contributions. If you have any ideas for future extractors, or simply find a bug to report, head over to our GitHub repository and file and issue.
If you use pliers in your work, please cite both the pliers GitHub repository and the following paper:
McNamara, Q., De La Vega, A., & Yarkoni, T. (2017, August). Developing a comprehensive framework for multimodal feature extraction. In Proceedings of the 23rd ACM SIGKDD International Conference on Knowledge Discovery and Data Mining (pp. 1567-1574). ACM. link
References
Kuperman, V., Stadthagen-Gonzalez, H. & Brysbaert, M. Age-of-acquisition ratings for 30,000 English words. Behav Res 44, 978–990 (2012). https://doi.org/10.3758/s13428-012-0210-4
Warriner, A.B., Kuperman, V. & Brysbaert, M. Norms of valence, arousal, and dominance for 13,915 English lemmas. Behav Res 45, 1191–1207 (2013). https://doi.org/10.3758/s13428-012-0314-x
Contributions
Alejandro de la Vega wrote the tutorial and code in this notebook. Emily Finn tested and lightly edited the notebook. Luke Chang updated broken links.